Category Archives: Uncategorized

Spiced Dark Chocolate Pistachio Cookies

OLYMPUS DIGITAL CAMERA

Do you bake to impress or bake to satisfy cookie cravings? Or perhaps, a routine? Even if it is a day to day passionate baking, certainly there is a motive that made you top the cupcake with chocolate shavings, pipe the perfect rose patterned icing or shaping the evenly squared cookie log before slicing them carefully. Most of the time I bake things that I would like to eat ( and that means more chocolate recipes! ) and so it is not so camera friendly but, it’s not an excuse really. I try to make things look as pretty as possible sometimes so that I can take beautiful pictures of it. That is baking to impress somebody, to the world. At times when I bake out of cravings, I bake something really quick, get it out of the oven, impatiently wait for it to cool, desperately snap a few pictures and poof! Gone into my tummy!

OLYMPUS DIGITAL CAMERA

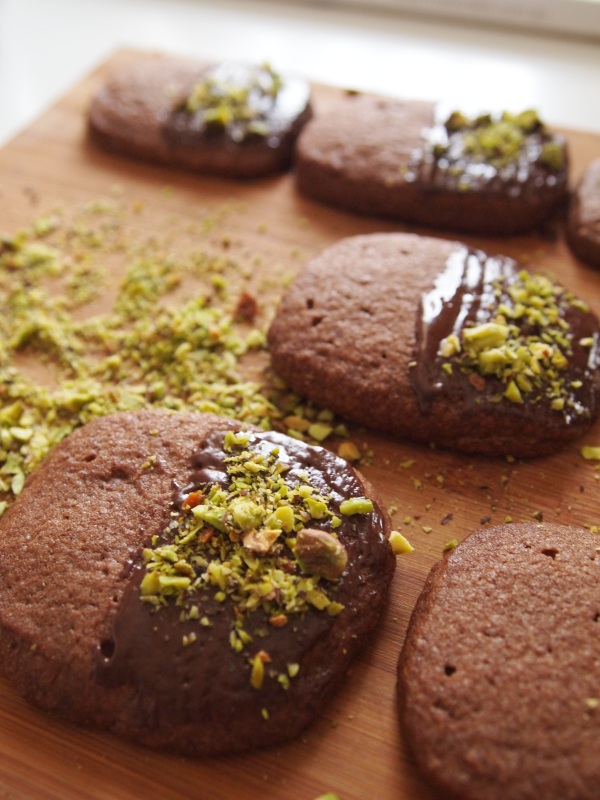
So when I have a day all to myself and probably not craving anything in particular, I like to try baking to impress. Means I put in more effort to make everything look prettier. And I came across a cookie that looks like it came out from a gourmet cookie box sitting in one of those hipster grocers. Pistachios, half covered with dark chocolate, shortbread. I told myself that even if it didn’t taste as good as it looks, I can still look at it and sigh, how pretty!

OLYMPUS DIGITAL CAMERA

I took my time baking these pretties, making sure I pause at each step. I’m glad they turned out slightly rustic looking and it would’ve been a nicer bite if the cookie is more short and less crisp. And maybe brush the dark chocolate more liberally, which I did towards the end.

The next time i bake these again I might use earl grey or cinnamon instead. The variations are just endless! They make an excellent gift as well because they look elegantly rustic.

OLYMPUS DIGITAL CAMERA

If you want to bake to impress, give this recipe a shot. It looks like there is a lot of effort, but actually there is just a few simple ingredients involved and best of all, a log and slice cookie where you can hide the imperfections with a brush of dark chocolate.

Spiced Dark Chocolate Pistachio Cookies

adapted from The Roaming Kitchen

225g unsalted butter, softened to room temperature
115g (1/2 cup) castor sugar
55g (1/4 cup) light brown sugar
30g (1/4 cup) Icing sugar (sifted)
30g (1/4 cup) unsweetened cocoa powder
1/2 teaspoon sea salt
1/4 teaspoon freshly grated nutmeg (I substituted with cardamom and cinnamon instead)
2 large egg yolks, room temperature
3 tablespoons freshly brewed coffee
1.5 teaspoons vanilla extract
220g (2 cups) flour
100 grams good quality dark chocolate
1/3 cup pistachios (as needed)

1. Cream butter for about 1 minute until smooth, preferably with a paddle attachment on medium speed.

2. Combine all three sugars, cocoa powder, salt and spices into the bowl of creamed butter. Beat until everything is incorporated and creamy (about a minute).

OLYMPUS DIGITAL CAMERA

3. Reduce mixer speed to low, add egg yolks one at a time, followed by coffee and vanilla extract.

OLYMPUS DIGITAL CAMERA

4. Turn off the mixer and add in the flour. You may use a wooden spoon/spatula to mix at this point till it is just incorporated. Do not overmix. The dough should be soft and quite moist.

OLYMPUS DIGITAL CAMERA

5. Take half the dough and place it on a cling wrap/baking paper. Roll and shape into a rectangular log. Repeat with the other half of the dough.

6. Refrigerate for 2 hours or until it is firm enough.

7. When the dough is ready, preheat the oven to 175C.OLYMPUS DIGITAL CAMERA

8. Slice the cookies into about 1cm thick. I think a thicker cookie works better here because you do not want the cookies to flatten too much in the oven, especially if the dough isn’t cold enough. That happened to my cookies and I thought a thicker slice would give a better result.

9. Bake for about 20 minutes and let it cool on a wire rack.

OLYMPUS DIGITAL CAMERA

10. When cookies are cooled, melt the chocolate over a double boiler. Roughly chop the pistachios.

OLYMPUS DIGITAL CAMERA

11. Brush the melted chocolate a few times over half the cookie and sprinkle with pistachios! Be patient and let the chocolate set before storing.

OLYMPUS DIGITAL CAMERA

Earl Grey Madeleines

ImageSome cakes are meant to be like that. Brownies are always sliced to squares, financiers in their oval shapes and madeleines, in their seashell like shapes. If not, it wouldn’t be called madeleines, silly! 

I can understand why if some people do not want to bake these, just getting the seashell molds might not be worth it. You know you’re not going to bake muffins in them.

Image
But I love madeleines! If a place sells them, I’ll definitely grab one and hope it’s as good as the one I tried at The Loaf. Unfortunately it seems that Sydney prefers macarons over madeleines.

Here, in my house, I attempted at baking this dainty pretty looking cake, using a Daiso madeleine mold which probably cost me $2 or less.

Here is the recipe I adapted from Gourmet Kitchen Tales but made a variation with Earl grey tea leaves, sorry, I just had to! It has to be Early Grey.

Image

There are so many variations on madeleine recipes out there. Some recipes calls for the whole egg, some does not require you to let the mixture rest in the fridge. I was overwhelmed honestly, recipe one after another. I chose this particular one because it sounded promising and it is from Joel Robuchon. It has to work! I also watched a really good demonstration by Rachel Khoo on youtube, actually that was how I discovered her shows and it just amazes me how she cook in that tiny little kitchen! I think she’s got a really good TV personality, I would say she’s the Asian Nigella Lawson. Anyway, back to the madeleines, she did an amazing episode on baking them which I think anyone attempting to bake one should watch it first.

Image

Image

Earl Grey Madeleines (Makes about 12)

100g Butter

100g Icing Sugar

40g Flour

40g Almond Meal

3 Egg whites

1 Orange Zest

2 Earl grey tea bags

Method:

1. Butter and flour the madeleine mold.

2. Melt the butter in a saucepan with the tea leaves. Put aside and let it cool.

3. Sieve flour and icing sugar together into a bowl. Mix in the almond meal.

4. Beat egg whites to a fluid consistency.

5. Add flour mixture into the egg whites and beat until you get a smooth batter.

6. Keep beating while adding in the cooled melted butter.

7. Place the batter into the fridge for about 1 hour to firm up.

8. When it is ready, preheat oven to 200C.

9. Spoon the batter into the molds. I suggest using a teaspoon to fill them in and under fill them (no more than 3/4 full).

10. Bake for 12-15 minutes or until they are golden brown in colour.


Orange poppyseed chiffon cake

As I grow older, I slowly got to understand my mother’s consumption habits, especially when it comes to food that she likes. And fashion too. When I was younger, she wore a lot of long sleeved top with colourful graphic prints which I thought was OTT, but now I am seeing those prints everywhere and even thought of getting one the other day. She also has a liking for anything with lace and linen (I used to question her taste for all things lacey) which I later became obsessed with for a while when I was in high school. I had no choice but to admit that “Yes mom, I now love lace too. Hey! We chose the same top!”. True story.


Not too long ago, I started to discover how wonderful chiffon cake is.

I mean, I always hear about how soft and fluffy it is and I’ve also tried it many times in my life, since young actually because it also happens to be my Mom’s favourite type of cake. So, it’s funny that I only start to like it now. That big pillow of airy cake, so light, can be boring at times and unsatisfying. That was exactly how i felt towards chiffon cake. How could my mom enjoy it so much. Perhaps its her Asian taste, preferring lighter desserts over rich creamy chocolate-y gooey brownies and cakes.

The chiffon cake that got me into this chiffon cake madness is the one from Azuma Patisserie. Everyone should try their chiffon cakes. It doesn’t need any explanation.

So I managed to get hold of a chiffon cake tin when I went back to Malaysia for my holidays. I even bought Okashi by Keiko Ishida, because I noticed her chiffon cakes recipes are everywhere. Since everyone made it look so easy, I tried.

Maybe the recipes are wrong, oven’s temperature wasn’t right, egg whites are not separated nicely and not beaten to its correct stiffness. I failed too many times. For other recipes, I tend to stay away from them a while if I fail the first time, but not for the chiffon cake. For everyone out there who failed at chiffon cakes, just keep trying.

Here, this time, I tried a recipe from the Australian Masterchef Magazine. This is the recipe which worked for me so far, but I think that is because of the higher flour content which differs from the Asian recipes.

Note for chiffon cakes:

Separate the egg whites when they are still cold (from the refrigerator) and let it slowly warm up to room temperature. I find it easier to separate them this way, if not the yolk tends to break easily. Tools must be absolutely clean as well. I rather have the cake stay longer in the oven than to take them out under cooked, because it will sink. Lastly, be patient while waiting for the cake to cool down after coming out from the oven. This will take more than an hour. You want it to be at least 85 percent cooled before removing it from the tin so that the cake is able to stand on its own and not collapse.

Orange poppyseed chiffon cake (makes a 25cm chiffon cake)

adapted from Masterchef magazine

Ingredients

400ml orange juice (to be reduced to half later)

7 eggs (separated)

330g (1 1/2 cups) castor sugar

125ml (1/2 cup) vegetable oil

Zest from an orange

40g (1/4 cup) poppyseeds

1/2 tsp cream of tartar

300g (2cups) self raising flour (sifted)

1. Preheat oven to 190C.

2. Place orange juice in a small sauce pan and bring to boil over med high heat. Cook for about 10 minutes until the juice reduced by half. Cool.

3. Using an electric mixer, whisk egg yolks and 165g(3/4 cup) sugar in a large bowl until pale and thick.

4. Combine 180ml (3/4 cup) of the reduced orange juice, oil, poppyseeds and zest in a jug. Gradually add to the yolk mixture and whisk till combined.

5. In stainless steel bowl, whisk egg whites until foamy. Add cream of tartar and whisk until soft peaks. Gradually add remaining 165g (3/4 cup) of sugar and whisk until stiff and glossy.

6. Add flour to egg yolk mixture using a wire whisk and whisk until well incorporated.

7. Take 1/3 of the meringue mixture and fold into the mixture using a wire whisk. This prepares the mixture for more meringue so it is easily incorporated later on. Then, fold in another 1/3 using the wire whisk gently. Finally, pour the mixture into the meringue bowl to incorporate the final 1/3 of the meringue.

8. Pour into chiffon cake tin and bake for 10min.

9. Reduce oven temperature to 170C and bake for another 50minutes or until skewer comes out clean.

10. Invert the cake tin after removing from the oven over a wine bottle. Leave cake to cool completely (may take more than an hour).

Reducing the orange juice to about half.

Invert the cake, with the help of a wine bottle. U need a bottle, trust me. I almost flatten my cake.

Chiffon cakes aren’t the prettiest cakes. To beautify them, whip up some whipped cream flavoured with syrup or just enjoy them bare as it is.

I didn’t use the fork in the end.

Caramel topped banana bread/cake

I grew up eating banana cake, not banana bread. Honestly, I am not sure of the difference. No one calls it banana cake here in Australia. Perhaps because its baked in a loaf pan, resembling a loaf of bread? But one thing’s for sure, they are both so easy to love and eat.
I have gone through countless recipes for banana bread….cake..bread. It was disastrous the first time i baked it. My friends and I ended up using the cake for a game where the loser had to finish them up. But that was during one of my early baking days. Still, that cant be an excuse because I baked another banana nutella bread not too long ago ( I mean, how bad can that be?) and let’s just say, it was definitely for the health conscious and someone who wants a  banana bread but tried to cheat and failed.


Banana bread after bread after bread. Then, comes this. Caramel, banana bread. Yes, caramel may seem too much for a banana bread to handle, but it worked so well! Especially when the caramel sets on top and a little on the sides. Neither one overpowered the other. This recipe has been in my Bourke St Bakery cookbook but somehow i always flip past it and jump to the familiar cakes i always see on display at their bakery. I don’t remember seeing this crazy banana bread in BSB!

So yeah, I shall call this the final banana bread recipe. I am going to stop searching for another one. Unless I stumble upon another one of course 😉


I don’t recommend toasting this like how we always toast and butter them. This should actually be called a banana cake, its more cake like. In fact, the recipe uses a round cake pan instead of the loaf pan but I halved the recipe and it fills up just nice in the loaf pan.

I made the caramel sauce earlier, just to feel more prepared.

Banana cake with caramel sauce (makes a 28cm round tin cake)
adapted from Bourke Street Bakery cookbook
For the banana cake:

250g unsalted butter

355g caster sugar

1 tsp vanilla bean paste

4 eggs

200g sour cream

300g self raising flour (sifted)

2-3 ripe bananas

20g soft brown sugar or golden syrup

1. Preheat oven to 200C.

2. Grease and line a 28cm (11 1/4 inch) round cake tin. Allow the baking paper to protrude 1 inch above tin.

3. Lightly mash bananas and drizzle with the brown sugar/golden syrup. Put aside.

4. Cream butter and sugar and vanilla with a paddle attachment on mixer. (if not, just use the normal beater) until soft and creamy.

5. Add eggs one at a time. Make sure it is fully incorporated before adding the next egg.

6. Add sour cream in two batches, then fold in sifted flour in two batches. ( I alternate between these 2)

7. Fold in the mashed banana into the mixture and pour into baking tin.

8.Bake for 55min to 1 hr 15min.


Caramel sauce (makes more than enough for a cake, but can be kept in the refrigerator for up to a week)

200ml whipping cream (35% fat)

100ml water

300g castor sugar

30ml liquid glucose (optional)

80g unsalted butter

1.Pour cream into saucepan over high heat and bring it to almost boiling point.

2. Put the water, sugar and glucose syrup in another larger saucepan over high heat and stir until sugar dissolves. Once it dissolves, do not stir and cook for another 7-10min or until it turns caramel in colour. Remove from heat immediately as it will continue to cook after.

3. Pour the hot cream into the caramel (be careful! as it will bubble up 4 times its original volume). Place it back on the heat and whisk until smooth. Remove from heat, cool a little and whisk in the butter.


Assembling

After cake cools for about 10min, poke about forty holes into the cake using a skewer and pour caramel sauce over the top while the cake is still warm.


Peanut Butter Choc Chunk Cookies ( that will cost you your waistline)

So i baked another version of choc chip cookies again. Peanut butter choc chip cookies. On any other day, this recipe will not even be in my “to bake” list since I’ve baked so many choc chip cookies that I kinda given up on finding a good one or I’ll most likely grab a $2/box amazingly delissshh choc chip cookies from Coles. After baking the banana muffins with peanut butter the other day and realizing it was a total ughh because of the peanut butter, I have decided to bake these monster cookies, as requested by a friend who had the peanut butter in the muffins. So I googled for PEANUT BUTTER CHOC CHIP COOKIES and expected lots of recipes with lotsss of reviews but settled for this recipe by Curtis Stone, with zero reviews HAHAH! just because the picture looks nice and the recipe looks promising. choc chunks? YES! Loads of peanut butter? YES YES!

Image

Trust me, the cookies are just heavenly! They are not your crunchy cookies, more like brownie cookie like texture. It’s like munching into smooth peanut butter, surprising yourself with choc in between mmm yums!

Eversince I started baking on an almost daily basis i have developed (finally!) what i called “baker’s sense”. Look through the recipe and each baking step conjures up in your head and even the outcomes perhaps.

Image

ImageMix all the wet ingredients. Mix mix mix! Got a little too excited when everything were mixed together into this creamy goodness. I might have licked my fingers in the process oops!

Image

Go on, roll em up into balls with your hands! the dough was a little too soft, so i pop them into the freezer for abit before forming into balls.

Image


So here’s the recipe

Peanut Butter Choc Chunk Cookies
, adapted from Curtis Stone

Ingredients

1 cup (110g) unbleached all-purpose flour
1/2 teaspoon baking soda
1/2 teaspoon salt
1 cup peanut butter (about 9 ounces / 280 grams) Recipe calls for chunky PB, but I only have smooth and its still yums, without the crunch
1/2 cup (packed) (115g) light brown sugar
1/2 cup (115g) granulated caster sugar
1/2 cup (1 stick / 125 grams) unsalted butter, at room temperature
1 ½ tablespoons honey
1 large egg
1 teaspoon vanilla extract
5 ounces / 155 grams semisweet chocolate, coarsely chopped

Method

  1. Preheat the oven to 350°F / 180°C.
  2. Line baking pan with parchment paper.
  3. Mix the flour, baking soda, and salt in a medium bowl.
  4. Using an electric mixer, beat the peanut butter, brown sugar, granulated sugar, butter, honey, egg, and vanilla in a large bowl until well blended.
  5. Stir the dry ingredients into the peanut butter mixture in 2 additions.
  6. Stir in the chopped chocolate
  7. Scoop about half tablespoon of dough for each cookie onto the prepared baking sheets, spacing them about 2 inches apart ( Recipe calls for 3 TABLESPOONS FULL! but i thought that would be Humongous! )
  8. Bake for about 12 minutes, or until the cookies puff and begin to brown on top but are still very soft to the touch. (Dont worry when they come out soft and shaped like a dome, it will set and deflate once it’s cooled, that is why its soft in the middle! )
  9. Cool the cookies on the baking sheets for 5 minutes.
  10. Using a metal spatula, transfer the cookies to a rack and eat warm or cool completely.

Hello world!

Welcome to WordPress.com! This is your very first post. Click the Edit link to modify or delete it, or start a new post. If you like, use this post to tell readers why you started this blog and what you plan to do with it.

Happy blogging!